How To Enable VNC On Raspberry Pi Terminal: A Simple Guide For Geeks
So, you're diving into the world of Raspberry Pi and want to enable VNC through the terminal? Well, you've come to the right place! Enabling VNC on Raspberry Pi is like giving yourself a superpower to remotely control your Pi from anywhere. Whether you're a beginner or a seasoned pro, this guide will walk you through every step of the process. Let’s get started!
Now, before we dive deep into the nitty-gritty of enabling VNC on Raspberry Pi, let me just say this—it’s not as complicated as it sounds. I’ve been tinkering with Raspberry Pi for years, and trust me, once you’ve done it once, you’ll feel like a tech wizard. But why VNC, you ask? Well, VNC allows you to access your Pi’s desktop environment remotely, so you don’t even need to connect a monitor or keyboard. That’s right, folks—it’s hands-free Pi-ing!
Before we move forward, let’s make sure you’re on the same page. If you’re new to Raspberry Pi, don’t worry—I’ll explain everything in simple terms. By the end of this article, you’ll not only know how to enable VNC on Raspberry Pi but also how to troubleshoot common issues and optimize your setup for seamless remote access. Sound good? Let’s go!
Read also:What Was The First Root Beer A Journey Through Time And Flavor
Why Enable VNC on Raspberry Pi Terminal?
Alright, let’s talk about why enabling VNC on Raspberry Pi is such a big deal. First off, VNC gives you complete control over your Pi’s desktop environment from any device with an internet connection. Imagine being able to manage your Pi from your laptop, phone, or even a tablet. It’s like having a remote control for your tiny computer. Plus, it’s super handy if you’re working on projects that require frequent updates or monitoring.
Here’s the deal: VNC is perfect for situations where you don’t want to clutter your workspace with extra monitors or keyboards. Maybe you’ve set up a home server or a media center, and you just want to access it remotely. VNC makes all of this possible without breaking a sweat. And the best part? You can do it all from the terminal, which is like the secret weapon of Raspberry Pi enthusiasts.
What You’ll Need to Enable VNC on Raspberry Pi
Before we get our hands dirty, let’s make sure you’ve got everything you need. Here’s a quick checklist:
- A Raspberry Pi (any model will do).
- Raspberry Pi OS installed on your SD card.
- An active internet connection (duh!).
- A basic understanding of Linux commands (don’t worry, I’ll guide you through them).
- A VNC client installed on your device (we’ll cover this later).
Got all that? Great! Now let’s move on to the fun part.
Step-by-Step Guide to Enable VNC on Raspberry Pi Terminal
1. Update Your Raspberry Pi OS
First things first, you need to make sure your Raspberry Pi OS is up to date. This step is crucial because outdated software can cause issues when enabling VNC. Open your terminal and type the following commands:
sudo apt update
Read also:Sandra Bullock And Keanu Reeves Speed The Ultimate Story Behind Hollywoods Iconic Duo
sudo apt upgrade
These commands will ensure your Pi is running the latest version of its software. While it’s updating, grab a cup of coffee and relax—it might take a few minutes.
2. Install the VNC Server
Now that your Pi is up to date, it’s time to install the VNC server. Luckily, Raspberry Pi OS comes with RealVNC pre-installed, so you don’t have to download anything extra. Just type the following command in the terminal:
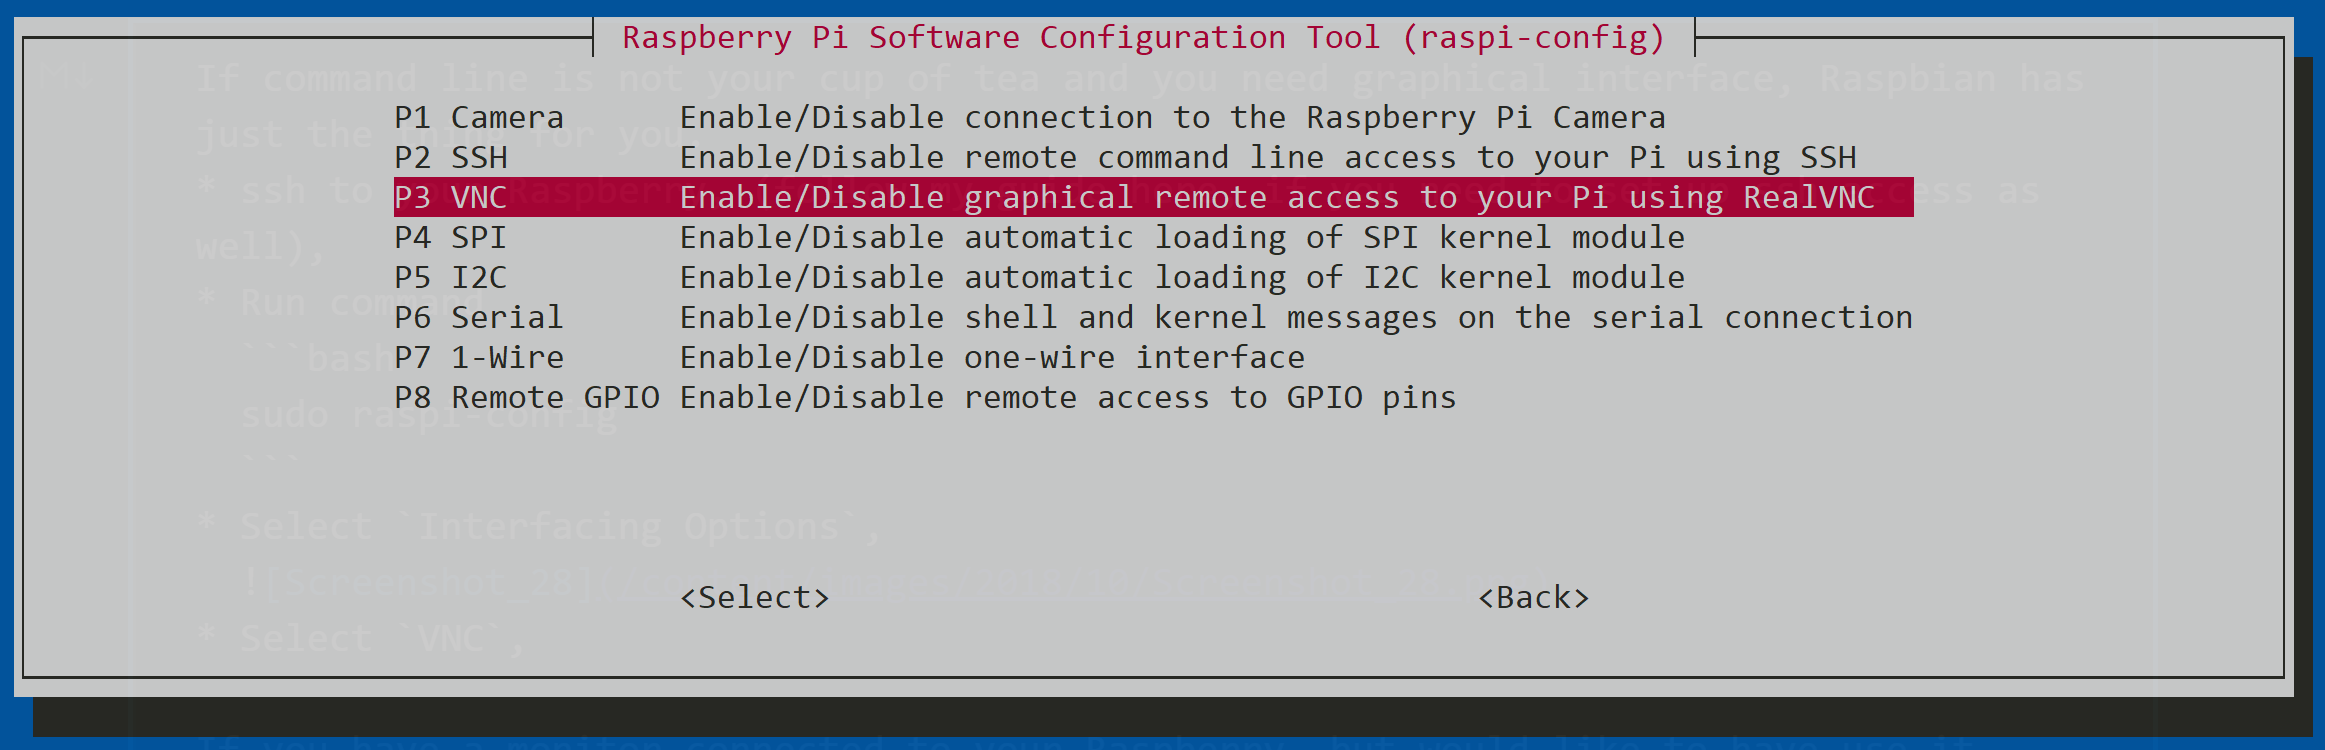
sudo raspi-config
This will open the Raspberry Pi configuration tool. Navigate to Interfacing Options, then select VNC, and enable it. Simple, right?
3. Restart Your Raspberry Pi
After enabling VNC, you’ll need to restart your Pi for the changes to take effect. Type the following command in the terminal:
sudo reboot
Once your Pi reboots, VNC will be ready to go. Now let’s move on to the next step.
Connecting to Your Raspberry Pi with a VNC Client
1. Download a VNC Client
Now that VNC is enabled on your Raspberry Pi, it’s time to connect to it from another device. You’ll need a VNC client, which is basically a program that allows you to access your Pi’s desktop remotely. There are plenty of options out there, but I recommend using RealVNC Viewer—it’s free and works like a charm.
Download the VNC Viewer app on your device and install it. Once it’s installed, open it up and enter your Raspberry Pi’s IP address. Not sure how to find your Pi’s IP address? No worries, we’ll cover that in the next section.
2. Find Your Raspberry Pi’s IP Address
Finding your Pi’s IP address is super easy. Just open the terminal and type the following command:
hostname -I
This will display your Pi’s IP address. Copy it and paste it into the VNC Viewer app. That’s it—you’re now connected to your Pi’s desktop environment!
Troubleshooting Common Issues
Let’s face it—things don’t always go as planned. If you’re having trouble enabling VNC on your Raspberry Pi, here are a few common issues and how to fix them:
- VNC Not Working: Make sure VNC is enabled in the Raspberry Pi configuration tool. Double-check that your Pi is connected to the internet.
- Connection Refused: This usually happens if your Pi’s firewall is blocking the connection. You can disable the firewall temporarily by typing sudo ufw disable in the terminal.
- Incorrect IP Address: Double-check that you’ve entered the correct IP address in the VNC Viewer app. If you’re still having trouble, try restarting your Pi and re-entering the IP address.
Still stuck? Don’t worry—there are tons of resources online to help you troubleshoot VNC issues. Just remember to stay calm and take it one step at a time.
Optimizing Your VNC Setup
1. Improve Performance
One of the most common complaints about VNC is that it can be slow, especially over a weak internet connection. Here are a few tips to improve performance:
- Lower the screen resolution on your Pi.
- Disable animations and visual effects on your desktop environment.
- Use a wired connection instead of Wi-Fi for better stability.
These tweaks might not seem like much, but they can make a huge difference in how smoothly VNC runs.
2. Secure Your VNC Connection
Security is always a top priority when it comes to remote access. Here are a few ways to keep your VNC connection safe:
- Use strong passwords for your Raspberry Pi.
- Enable SSH and tunnel your VNC connection through it.
- Consider using a firewall to block unauthorized access.
By taking these precautions, you can rest easy knowing your Pi is protected from prying eyes.
Advanced Tips for VNC Enthusiasts
Once you’ve mastered the basics of enabling VNC on Raspberry Pi, you can start exploring some advanced features. For example, did you know you can set up VNC to start automatically on boot? Or that you can customize the VNC server settings to suit your needs? The possibilities are endless!
Here’s a quick tip: if you’re planning to use VNC for heavy tasks like video editing or gaming, consider upgrading your Raspberry Pi’s hardware. A more powerful Pi will handle these tasks with ease, giving you a smoother VNC experience.
Conclusion
So, there you have it—everything you need to know about enabling VNC on Raspberry Pi through the terminal. From setting up the VNC server to connecting to your Pi remotely, this guide has covered all the bases. Remember, practice makes perfect, so don’t be afraid to experiment and try new things.
Before you go, I want to leave you with one final thought: enabling VNC on Raspberry Pi is just the beginning. Once you’ve mastered this skill, you’ll open up a whole new world of possibilities for your Pi projects. So, what are you waiting for? Get out there and start exploring!
Got any questions or feedback? Leave a comment below and let me know what you think. And if you found this article helpful, don’t forget to share it with your friends and fellow Pi enthusiasts. Happy tinkering!
Table of Contents
Article Recommendations