Access Raspberry Pi With Public IP: A Beginner's Guide For The Curious Minds
So here’s the deal, accessing your Raspberry Pi with a public IP is like opening up a whole new world of possibilities. Imagine being able to control your home automation systems from anywhere in the world or setting up a personal cloud server that you can access anytime. It sounds cool, right? But wait, there’s more. In today’s tech-driven world, knowing how to do this can save you time, money, and headaches. Stick around, because we’re about to dive deep into the hows and whys.
This article is designed to guide you through the process step by-step, whether you’re a total beginner or someone who just wants to level up their tech skills. By the end of this, you’ll not only know how to access your Raspberry Pi remotely but also understand the risks and best practices to keep everything secure.
Let’s face it, setting up remote access isn’t as complicated as it sounds. With the right tools and knowledge, you’ll be up and running in no time. So grab your Raspberry Pi, a cup of coffee, and let’s get started.
Read also:Will Smith And Jada Pinkett Relationship The Untold Story Of Love Trials And Triumphs
What You Need to Know About Public IPs
Alright, let’s talk about public IPs for a sec. A public IP address is like your home’s street address, but for the internet. When you connect to the web, your device gets assigned a public IP that allows others to find and communicate with it. Now, when it comes to Raspberry Pi, using a public IP lets you access it from anywhere in the world, as long as you have an internet connection.
Why Public IPs Matter
Here’s the thing, public IPs matter because they enable direct communication between devices over the internet. For instance, if you want to stream files from your Raspberry Pi to your phone while you’re on vacation, a public IP makes that possible. It’s like giving your Pi a direct line to the outside world.
How Public IPs Work
Public IPs work by assigning a unique address to your router, which then routes traffic to your devices inside your local network. When you set up your Raspberry Pi with a public IP, you’re essentially telling the internet, “Hey, here’s where you can find me!” But remember, this comes with some security considerations, which we’ll cover later.
Setting Up Your Raspberry Pi for Remote Access
Now that we’ve got the basics down, let’s move on to the exciting part—setting up your Raspberry Pi for remote access. The process involves a few key steps: configuring your network, setting up port forwarding, and securing your setup. Don’t worry, we’ll break it all down for you.
Step 1: Connect Your Raspberry Pi to the Internet
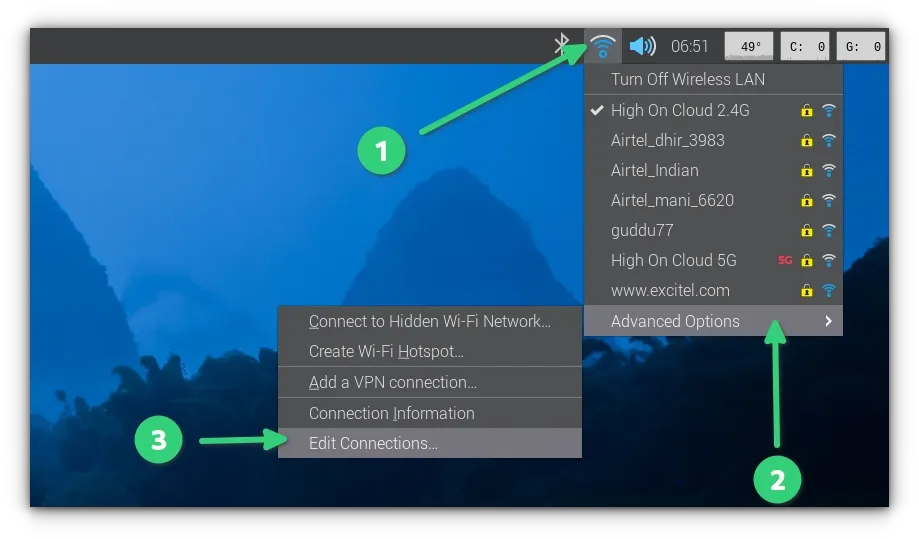
First things first, make sure your Raspberry Pi is connected to your local network. You can do this via Wi-Fi or Ethernet. Ethernet is usually more stable, so if you’re planning to do heavy lifting like streaming or running a server, go with the wired connection.
Step 2: Find Your Raspberry Pi’s Local IP Address
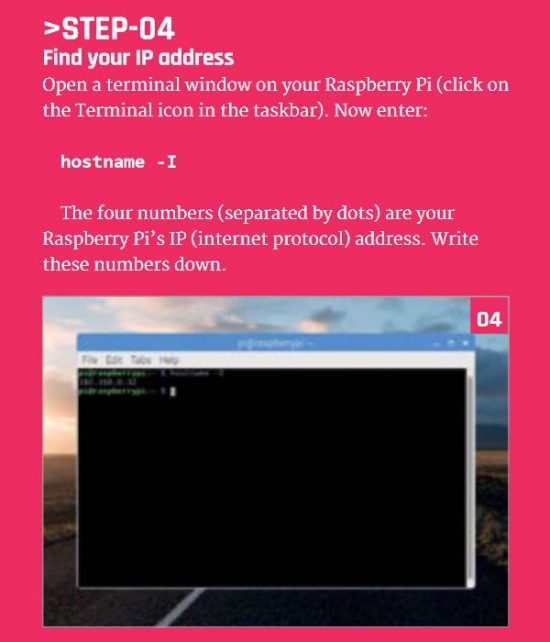
To access your Pi remotely, you’ll need to know its local IP address. Open the terminal on your Pi and type hostname -I. This will display your local IP, which usually looks something like 192.168.1.10. Jot it down, you’ll need it later.
Read also:Unveiling The Magic Of Popular Movies Bollywood A Journey Through Blockbuster Hits
Configuring Port Forwarding
Port forwarding is like setting up a doorbell for your Pi. It tells your router which device to send incoming traffic to. Without it, your Pi won’t know when someone is trying to connect to it from the outside.
Why Port Forwarding is Essential
Port forwarding is essential because it allows you to bypass your router’s firewall and direct traffic to your Raspberry Pi. Think of it as giving your Pi a special VIP pass to the internet.
How to Set Up Port Forwarding
Here’s how you do it: - Log in to your router’s admin interface. You can usually find the login details on the router itself or in the manual. - Navigate to the port forwarding section. - Add a new rule and specify the port number (commonly 22 for SSH). - Set the destination IP to your Raspberry Pi’s local IP. - Save the settings and test the connection.
Securing Your Raspberry Pi
Security is key when you’re exposing your Pi to the internet. You don’t want random strangers poking around your system, do you? Here are some tips to keep your setup safe:
Use Strong Passwords
First and foremost, use strong, unique passwords for your Pi. Avoid using common passwords like password123 or raspberry. Instead, go for something complex that includes letters, numbers, and symbols.
Enable SSH Keys
SSH keys are like digital keys that let you access your Pi without entering a password every time. To set them up: - Generate a key pair on your computer using ssh-keygen. - Copy the public key to your Pi using ssh-copy-id. - Disable password authentication in the SSH config file.
Understanding the Risks
While accessing your Raspberry Pi with a public IP is super convenient, it does come with risks. Hackers could try to exploit vulnerabilities in your setup, so it’s important to stay vigilant. Regularly update your Pi’s software, use firewalls, and monitor your system for suspicious activity.
Common Security Threats
Some common threats include brute force attacks, malware infections, and unauthorized access. To mitigate these risks, keep your software up to date, use firewalls, and limit SSH access to trusted IP addresses.
Testing Your Setup
Once everything is configured, it’s time to test your setup. Try accessing your Pi from another device on your local network, and then from a device outside your network. If everything works, congratulations! You’ve successfully set up remote access for your Raspberry Pi.
Troubleshooting Tips
If things don’t work as expected, here are some troubleshooting tips: - Double-check your port forwarding settings. - Ensure your Pi’s firewall isn’t blocking incoming connections. - Verify that SSH is enabled on your Pi.
Advanced Tips for Power Users
For those of you who want to take things a step further, here are some advanced tips: - Set up a dynamic DNS service to make it easier to access your Pi. - Use a reverse proxy to add an extra layer of security. - Consider setting up a VPN for encrypted connections.
Dynamic DNS Services
Dynamic DNS services like No-IP or DuckDNS allow you to assign a domain name to your Pi, making it easier to remember and access. All you need to do is install their client software on your Pi, and it will automatically update the domain name whenever your public IP changes.
Real-World Applications
Now that you know how to access your Raspberry Pi with a public IP, let’s talk about some real-world applications. You can use it to: - Set up a personal cloud server for file storage and sharing. - Run a home automation system that you can control remotely. - Host a website or web application.
Examples of Projects
Here are a few project ideas to inspire you: - Build a smart home dashboard that displays weather, news, and other info. - Create a personal media server for streaming movies and music. - Develop a custom IoT device that you can monitor and control from anywhere.
Final Thoughts
Accessing your Raspberry Pi with a public IP opens up a world of possibilities, but it also requires some responsibility. By following the steps outlined in this guide, you’ll be able to set up remote access securely and efficiently. Remember, security should always be a top priority, so don’t skimp on it.
Now it’s your turn. Try out the steps we’ve covered, and let us know how it goes. If you have any questions or need further assistance, feel free to leave a comment below. And if you found this article helpful, don’t forget to share it with your friends and fellow Pi enthusiasts.
References
Here are some sources we referenced while writing this article: - Raspberry Pi Documentation - No-IP Dynamic DNS - DuckDNS - Official SSH Documentation
Table of Contents
Article Recommendations